A ground ball — a batted ball that rolls or bounces along the infield dirt or grass — is the most common play an infielder has to make. Fielding one cleanly is not about having fast hands or a strong arm; it comes down to a few repeatable fundamentals: getting your body in front of the ball, keeping your glove low, using both hands, and then setting your feet to throw. This guide breaks the technique down step by step and gives you simple drills you can practise at a park, in a backyard or on a club training night, whether you are just starting out in Little League baseball or stepping up to a senior grade.
Start in the ready position
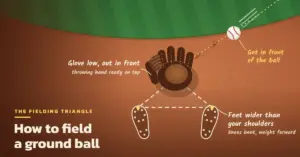
Good fielding begins before the ball is even hit. As the pitch is delivered, settle into an athletic ready position so you can move in any direction:
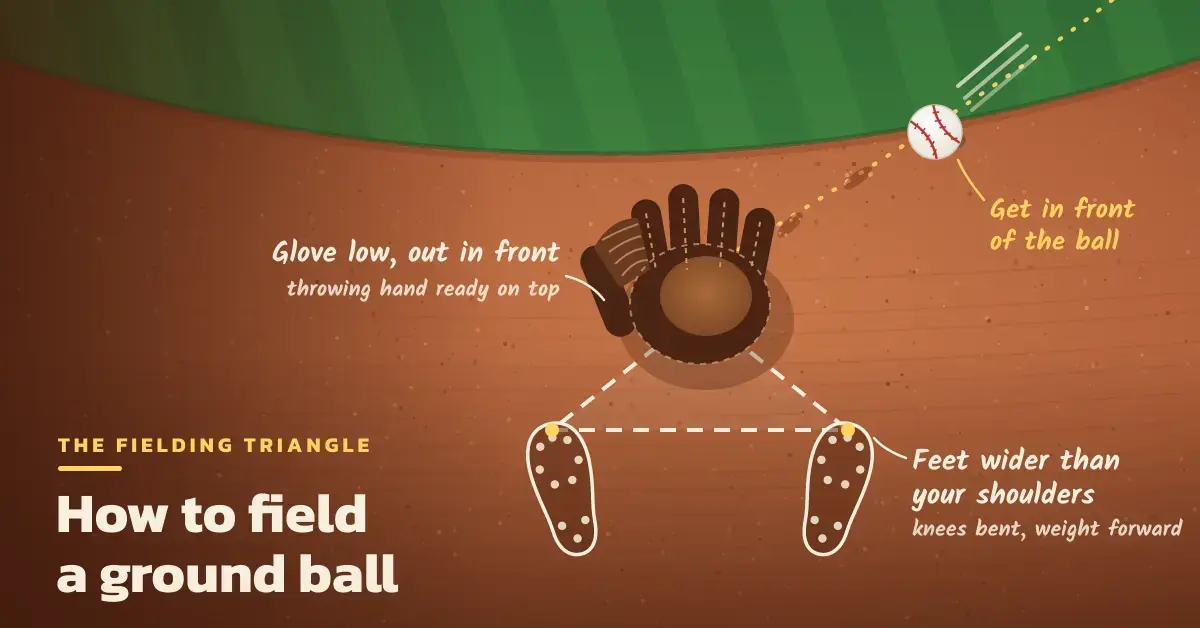
- Feet a little wider than shoulder-width apart.
- Knees bent and your weight on the balls of your feet, not your heels.
- Back fairly flat and your hands relaxed out in front of your knees.
Many infielders take a small “split step” — a light hop that lands them set and balanced — just as the ball crosses the front of home plate. Timing that step well can add roughly half a step of range because you are already moving when the ball comes off the bat.
How to field a ground ball step by step
Once the ball is hit, the play happens in a handful of quick, linked movements. Infielders — the first baseman, second baseman, shortstop and third baseman — field far more grounders than anyone else, so these steps are worth drilling until they feel automatic.
1. Read the hop
As soon as the ball leaves the bat, judge its speed and bounce. A hard-hit ball may reach you on a “short hop” (fielded just after it bounces), while a slower ball gives you time to adjust your feet to meet a comfortable hop. Reading this early tells you whether to hold your ground or move.
2. Get your body in front of the ball
Move sideways with short, quick steps to get your chest in line with the ball rather than reaching for it off to one side. Fielding it in front of your body means that if the ball takes a bad bounce and your glove misses, your body can still block it. As a rule, let the ball come to you — only charge in when it is a slow roller or a bunt that will otherwise die in the infield.
3. Get low and build the fielding triangle
Bend at the knees, not just the waist, and drop your hips toward the ground. Reach your glove out in front of your feet so that your two feet and your glove form a triangle on the ground, with the glove at the point. Keeping the glove out front — not tucked under your body — lets you watch the ball all the way in.
4. Glove down, with soft hands
Place the glove on the ground with the fingers pointing down and the pocket open toward the ball. Keep the glove still: patting or flipping it at the last second is a common cause of errors. “Soft hands” means giving a little as the ball arrives rather than stabbing at it, so the ball settles into the pocket.
5. Use two hands
Bring your bare hand to meet the glove so the heels of both hands form an “L” shape, ready to trap the ball and cover the pocket. A popular way to picture this is the “alligator”: the glove is the bottom jaw and your bare hand is the top jaw, snapping shut once the ball is in. Two hands secure the ball and get you into your throw faster.
6. Field out front and funnel to your body
Watch the ball into the glove with your head down, then “funnel” it in toward your belly button or chest. This brings your weight back over your feet and puts the ball where every throw naturally starts.
7. Set your feet and throw
Fielding should flow straight into throwing. A simple rhythm is “right–left–throw”: step with your throwing-side foot, then your glove-side foot toward your target, turning your front shoulder closed as you release. Throw only as hard as the play needs — most routine grounders do not require a maximum-effort throw. Clean footwork here is also the foundation for better throwing accuracy.
Fielding Checklist
- Ready: feet wider than shoulders, knees bent, weight on the balls of your feet.
- Read: judge the speed and hop off the bat.
- Move: get your chest in front of the ball with short, quick steps.
- Low: bend the knees and drop the hips; glove out front in a triangle with your feet.
- Glove down: fingers pointing down, pocket open, glove quiet.
- Two hands: bare hand meets the glove (the “alligator”).
- Watch it in: eyes on the ball into the glove, then funnel to your belly.
- Throw: right–left footwork to the target, only as hard as needed.
Common mistakes beginners make
- Standing too upright. Fielding from a tall stance forces the glove up and leads to the ball going under it. Stay low throughout the play.
- Reaching to the side. Catching the ball off to one side instead of moving the feet to get in front leaves no body behind a bad hop.
- Fielding one-handed too soon. One hand is for balls far out of reach; on routine grounders, use two.
- Last-second glove movement. Patting, flipping or jabbing the glove throws off your timing — keep it quiet and let the ball come in.
- Looking up early. Lifting your eyes to find the target before the ball is secured causes drops. Watch it all the way into the glove.
- Charging everything. Running hard at every ball distorts your read on the hop; let most grounders come to you.
Drills to practise fielding ground balls
You improve by building the movement from simple to complex — crawl before you walk. Start slow and controlled, then add speed and live hits. These pair well with the wider baseball drills for youth players you may already run, and younger kids can find more ideas in these drills for U12 players.
Bare-hand roll drill
With no glove, have a partner roll balls gently to you from about 3–6 metres away. Field with two bare hands in the correct low position. Removing the glove forces soft hands and teaches you to receive the ball out in front.
Alligator drill
Field slow rolled balls using the alligator motion — glove on the ground, bare hand snapping down on top. Do 10–20 reps focused only on the hands before you add any footwork.
Short-hop drill on your knees
Kneel on both knees about 3 metres from a partner who throws firm short hops at you. On your knees you cannot cheat with your feet, so you learn to trust your hands and give softly with the ball.
Rhythm drill (three directions)
Have a coach roll or hit grounders in a set pattern — straight at you, to your glove side, then to your backhand side — and field five of each. This builds the footwork to field balls you have to move for, not just the ones hit right at you.
Wall-ball drill
On your own, throw a tennis or rubber ball against a solid wall and field the rebound in the proper position. It is an easy way to get dozens of repetitions and sharpen your reactions between training sessions.
Choosing and preparing your glove
A glove that fits and closes easily makes fielding far simpler. Infield gloves are usually smaller (around 11 to 11.75 inches) with a shallower pocket so you can get the ball out quickly, while outfielders use larger gloves. Whatever you choose, take time to break in a baseball glove so the pocket forms and the leather flexes — a stiff, brand-new glove will fight you on every ground ball.
Sources
Frequently asked questions
What is the difference between a short hop and a long hop?
A short hop is a ball you field just after it bounces, while the ball is still rising close to your glove; a long hop is one you catch near the top of a high, slower bounce. Both are easier to handle than an “in-between” hop that lands awkwardly at your feet. If you read an in-between hop coming, adjust your feet to turn it into a short or long hop.
Why does the ball keep popping out of my glove?
Usually it is hard hands — stabbing at the ball instead of giving with it — or not covering the pocket with your bare hand. Slow down, field the ball out in front where you can see it, and bring your top hand over as the ball lands. The bare-hand and short-hop drills fix this quickly.
Do I really need to use two hands?
On routine ground balls, yes. Two hands secure the ball, protect against a bad bounce and get you into your throw faster. Save one-handed fielding for balls you can only reach by stretching to your backhand side.
How often should beginners practise fielding?
Short, frequent sessions beat occasional long ones. Even 10–15 minutes of rolled grounders or wall-ball a few times a week builds the muscle memory, especially when you focus on clean technique rather than how hard the ball is hit.
Is fielding a ground ball different in softball?
The core technique is the same — stay low, get in front, soft hands, field out front and funnel to the body. The main differences are the larger ball and shorter base paths in softball, which give you a little less time to react, so quick footwork matters even more.