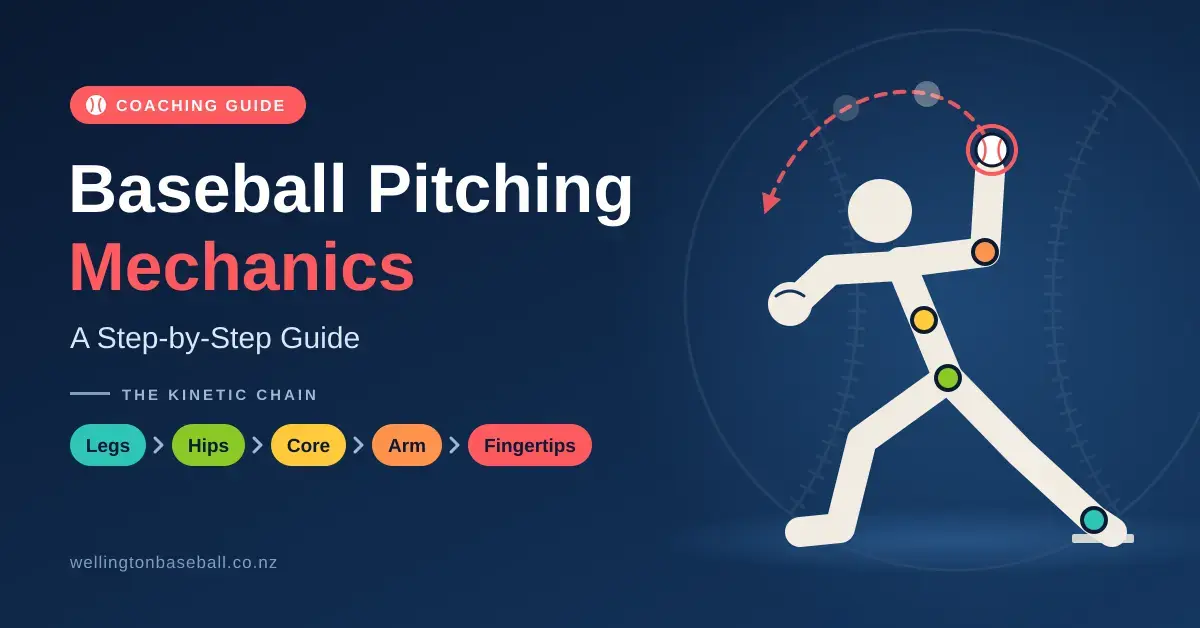
Good pitching mechanics are the repeatable movement pattern a pitcher uses to deliver the ball with velocity, accuracy and as little stress on the arm as possible. The motion is best understood as a kinetic chain — a sequence in which energy created by the legs against the ground travels up through a braced core and is released through the arm and fingertips. When each link fires in the right order, the arm becomes the fast end of a whip rather than the muscle doing all the work. This guide breaks the delivery down phase by phase for players and coaches in Wellington and across New Zealand, from the first movement on the rubber to the follow-through, with a strong focus on the arm-care rules that keep young pitchers healthy. If you are new to the position, it pairs well with our overview of the pitcher’s role in baseball.
Key Points
- Pitching is a kinetic chain: power starts in the legs and hips, transfers through the core, and finishes through the arm and fingertips.
- Phases in order: set-up and grip, balance point, stride, hand separation and arm path, hip-shoulder separation, release and extension, follow-through.
- Lead with the hip, not the arm — this builds velocity and protects the elbow and shoulder.
- A full follow-through lets the big muscles absorb the throw and prevents shoulder injuries.
- Arm care comes first: follow Pitch Smart pitch counts and rest days, and never pitch through sharp pain.
How the Kinetic Chain Powers a Pitch
Velocity does not come from a strong arm alone. In an efficient delivery, the largest muscles — the legs and hips — start the movement, the core transfers that energy, and the smaller muscles of the shoulder and forearm finish it. Biomechanics research consistently shows that trunk rotation is one of the strongest predictors of ball speed, and that pitchers who sequence the chain well tend to place less strain on the elbow and shoulder. In other words, clean mechanics usually make you both faster and safer at the same time.
The practical goal is efficiency: every movement should either add power or make the release point more consistent. In Wellington’s often windy, coastal conditions a loose or rushed delivery quickly turns into walks, so coaches stress staying balanced and leading with the lower body rather than throwing with the arm.
The Set-Up: Stance, Grip, Windup and Stretch
Every pitch begins from one of two legal starting positions. The windup is the full, rhythmic motion used when no runners are on base. The stretch (or set) is a shorter, sideways-on motion used with runners on, because it gets the ball to the plate faster. From the windup, the feet start roughly shoulder-width apart with the pivot foot (the foot on the throwing-arm side) in contact with the front edge of the rubber. The shoulders stay relaxed and the hands are held comfortably around chest height to hide the grip from the batter.
Most beginners default to the four-seam fastball grip — index and middle fingers placed across the wide seams, the ball held in the fingertips rather than buried in the palm. This grip produces clean backspin, which keeps the ball travelling straight and makes it the easiest pitch to command while you are learning. For more on hitting your spots once the grip is sorted, see our guide to improving throwing accuracy.
Pivot Foot and Rubber Contact
Secure contact with the rubber is what lets a pitcher push, or drive, toward the plate. If the pivot foot is not set, power is lost before the arm even moves.
- Foot placement: the pivot foot sits parallel to and against the rubber, ready for a clean turn.
- Weight distribution: keep weight toward the balls of the feet for an athletic, responsive start.
- Focus: use the set-up to pick a small target in the catcher’s mitt and commit to the pitch type.
- Rhythm: a small controlled step starts the motion without shifting your centre of gravity too far.
The Balance Point and Leg Lift
As the pitcher lifts the lead leg, they reach a brief moment of balance over the pivot leg. This balance point sets the timing for everything that follows. The lead knee lifts to around waist height with the toe pointing down to keep the leg relaxed. If the body tips forward or backward here, the arm has to compensate, which costs both accuracy and arm health. A common coaching drill is to hold the lift for a two- or three-count to prove the core is engaged and the head is still.
Keeping the Head and Eyes Level
The secret to repeatable accuracy is keeping the head — and therefore the eyes — level and quiet through the delivery.
- Centre of gravity: keep the weight over the middle of the pivot foot, not the heel or toe.
- Head position: eyes stay on the target throughout the lift.
- Posture: avoid leaning back or hunching forward over the belt.
- Core engagement: the abdominal and oblique muscles stop the torso from swaying.
- Soft back knee: a slight bend prevents the posting leg from locking out.
The Stride: Leading With the Hip
From the balance point the pitcher drives toward the plate. Rather than reaching with the lead foot, the better cue is to lead with the front hip, letting the body move down the mound while the back leg pushes off the inside of the pivot foot. This builds momentum before rotation begins. New Zealand athletes who come from rugby or football often have strong lower bodies that suit this phase well.
Stride length is commonly cited at roughly 80% to 100% of a pitcher’s standing height, though it varies by body type — treat it as a guide rather than a rule. Landing too short leaks velocity; landing too long can cause the front side to collapse and the ball to sail high. If you are chasing more speed, our guide to training pitching velocity at home covers lower-body drive drills in detail.
Direction and Front-Foot Plant
The direction of the stride largely decides where the pitch goes. The lead foot should land in line with the target, toe pointing at or slightly inward of the catcher.
| Stride factor | Rough guide | Common error |
|---|---|---|
| Stride length | ~80-100% of height | Too short reduces velocity |
| Landing direction | Lead foot toward target | “Opening up” early causes arm drag |
| Hip direction | Front hip leads to target | Early rotation leaks core power |
| Front leg | Braces firmly on landing | Soft front leg loses energy transfer |
Hand Separation and the Arm Path
As the front leg moves out, the hands break apart over the middle of the body. The throwing hand travels down, back and up into the power position — roughly a 90-degree bend at the elbow with the upper arm level with the shoulders, often called the 90/90. A compact arm path that keeps the ball closer to the body is usually easier to repeat than a long, sweeping one. At the same time the glove reaches toward the target and then tucks into the chest, giving the torso something to rotate against.
Pitchers eventually develop a natural arm slot — over-the-top, three-quarters or sidearm — and the key is to repeat the same slot every time so the ball comes out of a consistent window. For a plain-language reference on pitch types and terminology, see Wikipedia.
Timing the Arm to the Front Foot
- Hand break: separate the hands as the lead knee starts down from the balance point.
- Elbow height: the throwing elbow is roughly level with the shoulder as the arm comes up.
- Glove tuck: pull the glove to the chest to help start shoulder rotation.
- Loose wrist: keep the wrist relaxed so it can snap through at release.
- Be on time: the arm should be up and near the power position as the front foot lands.
Hip-Shoulder Separation and Rotation
Most of a pitcher’s velocity comes from torque created by hip-shoulder separation. As the front foot lands, the hips begin rotating toward the plate while the shoulders stay closed for a split second longer. This stretches the core muscles like a loaded spring; when the shoulders catch up, that stored energy whips the arm through. Studies of college and professional pitchers link greater separation at foot plant with higher trunk-rotation speed and, importantly, with lower peak loads on the elbow and shoulder.
For young players this is a strong argument for building core strength and hip mobility. When the hips and shoulders rotate together as one block, velocity drops and the elbow absorbs more of the strain.
Sequencing From the Ground Up
| Sequence | Result | What it needs |
|---|---|---|
| Hips and shoulders together | Velocity left on the table | Little core involvement |
| Some separation | Improved velocity | Adequate hip mobility |
| Good, well-timed separation | Peak velocity potential | Core strength and timing |
| Shoulders fire first (out of order) | Higher injury risk, flat pitches | Usually a timing fault to fix |
The Release Point and Extension
The release is the moment of truth, and accuracy depends on letting the ball go from the same point in space every time. To get the most out of the delivery, pitchers aim for extension — reaching out toward the plate at release rather than cutting the arm off early. Releasing the ball further out in front means the hitter sees it for less time, so a pitch can play faster than the radar gun reads. Rather than simply letting go, the fingers stay behind and through the ball, creating backspin on a fastball or the spin that shapes a breaking ball.
Downward Plane and Finishing the Pitch
- Extension: reach out toward the catcher at release for added perceived velocity.
- Finger pressure: even pressure from the index and middle fingers keeps a four-seamer straight.
- Downhill angle: throwing on a downward plane from the mound makes the ball harder to lift.
- Eyes on target: track the mitt all the way through the release.
Deceleration and the Follow-Through
A pitch is not finished when the ball leaves the hand. The follow-through lets the body safely absorb the huge forces generated during the throw, which is why it matters so much for arm health. The throwing arm should swing freely across the body and finish near the opposite hip or knee, while the back leg comes around and lands in a balanced, athletic position. Many shoulder problems in club baseball come from pitchers stopping the arm abruptly after release, which forces the small rotator-cuff muscles to do the braking instead of the larger back and leg muscles.
Finishing as a Fielder
Once the ball is gone the pitcher becomes, in effect, a fifth infielder. A balanced finish leaves you ready to field a ball hit straight back up the middle.
| Follow-through check | Good sign | Warning sign |
|---|---|---|
| Arm finish | Across the body, past the opposite knee | Arm stops at the hip (high stress) |
| Back leg | Comes around to a balanced landing | Stumbling or falling off to the side |
| Head | Level, eyes on the target | Head ducking down toward the dirt |
| Posture | Chest finishes over the front knee | Standing bolt upright immediately |
Pitching From the Stretch and Holding Runners
With a runner on base, the pitcher switches to the stretch to cut down the time it takes the ball to reach the plate. Standing sideways with the feet closer together, the pitcher comes to a complete, legal stop (the set) before a quick leg lift and drive. Coaches measure the pitcher’s delivery time — from first movement to the ball hitting the mitt — and aim for roughly 1.3 seconds or quicker to give the catcher a realistic chance of throwing out a base-stealer. Note that this is different from pop time, which measures the catcher’s throw from the plate to second base (about 2.0 seconds at the top level).
Precise, legal footwork matters here. Failing to come to a complete stop, or faking a throw incorrectly, results in a balk, which advances every runner one base. A quicker leg lift, or slide step, is a useful tool against fast runners.
Command, Strategy and Composure
Mechanics only matter if a pitcher can use them under pressure. Command — the ability to throw a chosen pitch to a chosen spot — is what separates pitchers from throwers. Getting ahead in the count makes a real difference: hitters perform far worse after a first-pitch strike (0-1) than after a first-pitch ball (1-0), so working ahead is one of the simplest ways to control an at-bat. Changing speeds, mixing a fastball with a slower changeup, disrupts a hitter’s timing, and the best pitchers keep a short memory, resetting fully for the next pitch after a mistake.
Arm Care, Pitch Smart and Injury Prevention
For youth pitchers, arm care is the most important part of the whole topic. Baseball New Zealand was the first international federation to adopt the Major League Baseball and USA Baseball Pitch Smart programme, and it applies Pitch Smart pitch-count and rest guidelines across its competitions. These are age-based daily pitch limits with mandatory rest: the more pitches thrown in an outing, the more days a pitcher must rest before pitching again — up to four days’ rest for the highest counts. Pitch Smart also recommends at least four months off from competitive pitching each year, with two to three of those months continuous, and advises against pitching on consecutive days at younger ages.
Pitch Smart Limits
| Age group | Daily maximum pitches |
|---|---|
| 7-8 | 50 |
| 9-10 | 75 |
| 11-12 | 85 |
| 13-14 | 95 |
| 15-16 | 95 |
| 17-18 | 105 |
Required rest rises with pitches thrown. For ages 15-18: 1-30 pitches need no rest day, 31-45 one day, 46-60 two days, 61-75 three days, and 76 or more require four days. Plus at least four months off competitive pitching each year. Source: MLB/USA Baseball Pitch Smart.
The golden rule is simple: never pitch through sharp pain. General muscle soreness can be normal, but stabbing or pinching sensations in the elbow or shoulder are signs to stop and seek advice from a doctor or physiotherapist. These limits sit alongside broader junior baseball safety practices used across the region.
A Simple Daily Arm-Care Routine
- Warm up first: around 10 minutes of dynamic movement and easy throwing before pitching hard.
- Resistance bands: light internal and external rotations help stabilise the shoulder.
- Leg and core strength: strong legs and trunk take load off the arm — never skip them.
- Active recovery: light movement and mobility work generally beat sitting with ice for long periods.
- Rest and sleep: respect the rest days; recovery is when the arm actually adapts.
Structured, repeatable practice helps too. Our collection of baseball drills for youth players includes throwing and arm-health work suited to Kiwi clubs.
Common Mistakes to Avoid
- Flying open: the lead shoulder and hip rotate toward the plate before the front foot lands, costing accuracy and straining the arm.
- Throwing with the arm only: under-using the legs and core puts the whole workload on the shoulder and elbow.
- Rushing the balance point: drifting forward too early ruins timing between the lower body and arm.
- Stopping the arm early: cutting the follow-through short removes the body’s natural braking system.
- Ignoring pitch counts: the single biggest avoidable cause of overuse injury in young pitchers.
Disclaimer
This article is general educational information about baseball technique and is not medical advice. Pitching places significant stress on the growing arm. Always follow Pitch Smart and Baseball New Zealand age limits, and consult a qualified doctor or physiotherapist about any pain, injury, or before starting an intensive throwing or weighted-ball programme.
Reference sources
Frequently Asked Questions
What is the most common pitching mechanics mistake in young players?
“Flying open” is the most common fault: the front shoulder and hip rotate toward the plate before the lead foot lands. It leaks velocity, scatters accuracy and increases strain on the elbow and shoulder.
How can I add pitching velocity safely?
Most safe velocity comes from better leg drive, hip-shoulder separation and a repeatable arm path, backed by lower-body and core strength. Weighted-ball programmes should only be used by older, physically mature players under qualified supervision.
What are the Pitch Smart guidelines?
Pitch Smart is a Major League Baseball and USA Baseball programme of age-based daily pitch limits and mandatory rest days designed to prevent overuse injuries. Baseball New Zealand applies these guidelines across its competitions.
Why is the four-seam grip recommended for beginners?
The four-seam fastball produces clean backspin that keeps the ball on a straight, true path. That makes it the most predictable pitch to control, so it is the best grip for learning to command the strike zone.
How often should I film my pitching mechanics?
Every two to four weeks is a sensible rhythm for most players. That is often enough to spot timing faults or “velocity leaks” and track changes, without obsessing over every single throw.